Showing posts with label sewing. Show all posts

Friday, July 5, 2019

Simplicity 8342 Retro Halter Knit Top

Pattern Review for Simplicity 8342, scroll below photos. 


Pattern Description: Misses / Women's Knit Top
Pattern Sizing: 10-18. I cut a pattern size 14 and I am currently fitting into a size 8/10 in RTW.


Did it look like the photo/drawing on the pattern envelope once you were done sewing with it? I made View A & yes it looked exactly like the photo on the pattern. 

Were the instructions easy to follow? The instructions are pretty easy to follow. 

What did you particularly like or dislike about the pattern? I am still not sure about the front of the straps. The instructions said to hand stitch to the inside of the bodice facing, but I didn't like the way they looked finished. But I may have to put in a few more slip stitches from the inside of the bodice.

Fabric Used: I used a jersey/spandex fabric in a black & white stripe.  

Pattern alterations or any design changes you made: No Alterations


Would you sew it again? Would you recommend it to others? Yes, this is a great pattern. Very fast & easy to sew up. I would actually love to make it into a below the knee snug fitting dress. And a cropped top with a pencil skirt would also be adorable in a Hawaiian print for those last minute Luao       . 


Conclusion: Fun, Fast, & Flattering on any figure. And the possibilities in fabric colors & pattern are endless. I love that it looks very retro too. Definitely a keeper! 

Friday, April 13, 2018

Cynthia Rowley 2406


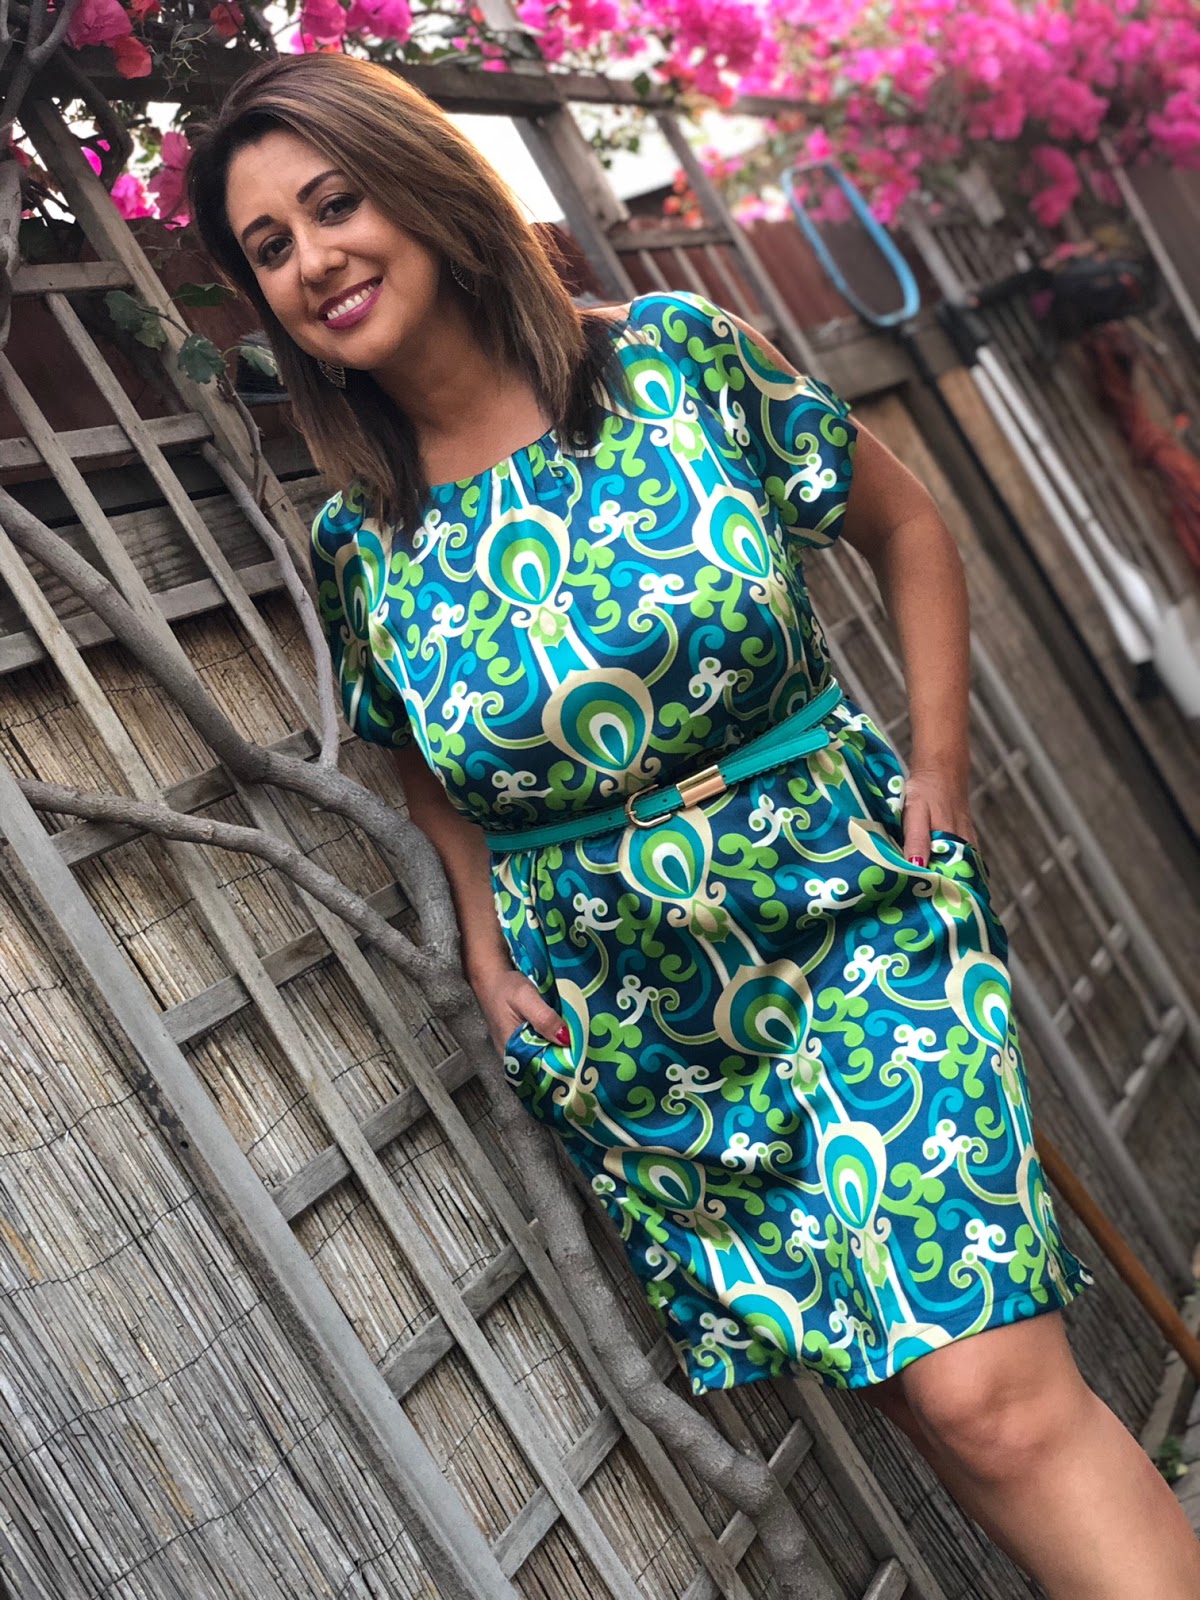
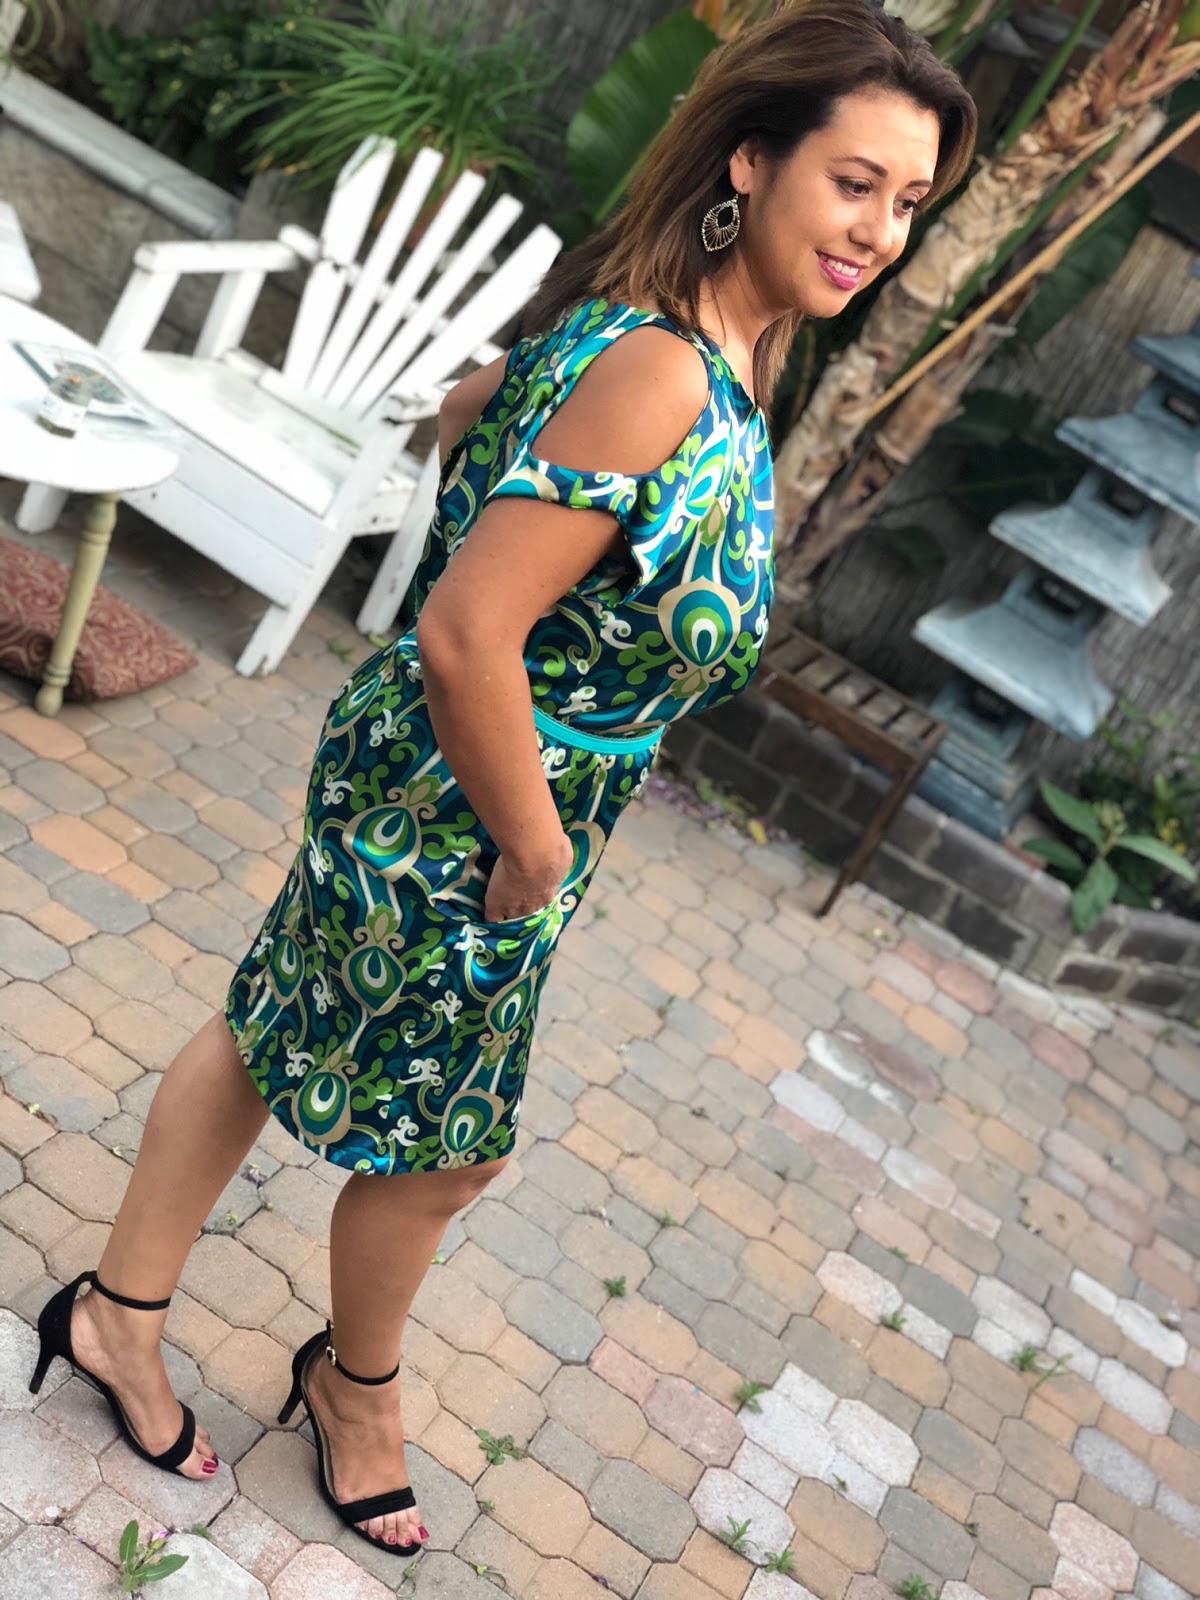
I've been gone way too long & I'm excited to return to blog land! Instagram has been fun & convenient & I love the eye candy on there, but I do miss documenting more details of my sewing adventures. So here I'm sharing a Cynthia Rowley dress by Simplicity 2406 that I actually made about two summers ago and just now got around to asking my hubby to take some pics of me wearing it. It's a cute and flattering fit, and fun to wear. Hope you like it! My Pattern review can be found at the bottom of this post as also shared on the PatternReview Site. 


Pattern Description: Misses Dress in Three Lengths with Sleeve variations. 
Pattern Sizing: 14-22 ( I originally made the pattern size 16 which is equivalent to a size 12 in women's clothing. But I'd like to size it down a bit since I've lost some weight since I made this dress ).

Did it look like the photo/drawing on the pattern envelope once you were done sewing with it? I sewed up View B & Yes it looked just like the pattern envelope once it was completed!

Were the instructions easy to follow?The trickiest part for me I would say were the sleeves, and I consider myself an intermediate to advance sewist. I admit I goofed up and attached one of the sleeves incorrectly so I had to pick it apart & re do it, so you really have to pay close attention to the illustrations to make sure you attach the sleeves on the correct way.

What did you particularly like or dislike about the pattern? I did not particularly like the open back specifically because it didn't seem to fit very flattering on me as it tends to open up a little wonky. I think the interfacing I used on the back portion was maybe a bit too thick which is why it doesn't drape as pretty. And although I love side pockets, I was not too happy with how low mine sat, but that's really because I did not take the time to experiment the most comfortable placement. 

Fabric Used: I'm not exactly sure if its a poly-sateen...I bought it a few years ago & had it in my stash. 

Pattern alterations or any design changes you made:I did not attach a zipper to the skirt portion since I don't think it really needed it since the backside opens up making it easy to slip on. I also did not have enough to make a sash so I wear it with a belt. But I do think the matching sash would have been pretty. 

Would you sew it again? Would you recommend it to others?It's a lovely pattern & I bet many women would love it since it's an attractive style. But personally, I don't see myself making this exact view again. The sleeves traumatized me...just kidding! I'm just a little lazy sometimes when it comes to this particular lined sleeve. I have made View D before & it's a much easier make. 

Conclusion: Very stylish, and attractive style. & you will get lots of compliments! 

Tuesday, June 14, 2016

Cynthia Rowley Jacket 2443

Here's the jacket I recently made using Cynthia Rowley 2443. Full review at the bottom of the photos.


Pattern Description: Misses' Dress with Knit Bodice and Jacket or Vest

Pattern Sizing: 6-14 ( I added a a bit more to the size 14 seam allowance to make it a tad roomier ).

Did it look like the photo/drawing on the pattern envelope once you were done sewing with it? Yes, with the exception of no loop holes or ribbon ties, as I opted to leave it without.

Were the instructions easy to follow? I would say for the most part yes, however, when it gets to the sleeve cuff and slit/closure part, it gets pretty confusing. I thought I cut mine as the directions called for, but when I started sewing it up I noticed a much wider gap than the illustration was showing, so I had to overlap the closure slightly to top stitch it.

What did you particularly like or dislike about the pattern? I love the quarter length sleeves and the ring buckle closure detail, and the front facing. 

Fabric Used: I used a stretch denim I found a Joann's.

Pattern alterations or any design changes you made: I'm going to add additional side ring buckle enclosures on the waist because it's a little baggy around that area, and I want it a tad more fitted. I also opted out of the front loops with ribbon ties, while I think it looks cute in the photo, I think it would look sloppy on me. 

Would you sew it again? Would you recommend it to others? I might consider sewing it up again in a fun print, or bolder color. I do recommend it to anyone wanting to try sewing with denim. Just make sure to use a proper denim needle & you should be good to go. 

Conclusion: Overall I enjoyed making this jacket. It gave me pretty good practice on my top stitching. I had originally planned on topstitching it in my favorite turquoise color but I might do that if I ever make it in a white denim. 


Monday, May 23, 2016

Simplicity 2380

I recently bumped into my friend at the mall when she mentioned to me that she had trouble finding a cute jumpsuit in a Hawaiian print for her daughter's school promotion to 6th grade which was going to be in a few days. Since I love to sew & always looking for an excuse to do it, I volunteered myself to just make it. I immediately remembered I had a cute Jumpsuit pattern by Simplicity at home that I had not cut into. Here's the pattern.


So when I went to the fabric store the next day I texted her a pic of these 3 Hawaiian prints I thought would be cute for this pattern.


Since she didn't respond while I was in the fabric store, I just went ahead and purchased two yards of the black one in the middle, since it was on sale for 5.99 per yard & I figured it would be popular amongst pre teens. -But It was a good thing I bought it since later that day she said she liked the black one.

Here is the finished jumpsuit. I made view B in a size 14.  This is a super easy to follow pattern that would make an excellent beginner's project. You can't really see the ruffle at the top and in hindsight, I should have used a contrasting solid color for the bodice ruffle. & I bet the pockets would also look cute in a contrasting color. I'll have to make another one.


And here are a few more pics of her wearing it & a pic with me & my little 5 year old, which btw, I realized that the outfits we wore to church on this day I had also made sometime last year.


Sunday, October 5, 2014

Simplicity 1435

I had Simplicity 1435 in my stash for a while thinking I'd use it to make some leggings for my 3 year old, but decided to make View C of the dress with some changes. 

The pattern is sized for "stretch knits only" but I used about 1 3/4 of cotton, added a zipper on the back, & made it with a pleated style skirt instead of the single or double ruffled layer the pattern called for. I was quite pleased with how it turned out!


I found the cotton print at Joann's ( in a light turquoise blue with red cherry blossoms ), very adorable. 


I get asked a lot where I bought her shoes. They are from Gymboree. Red & white polka dots with a blue face. Very darling & one of her favorite pairs. 


I made this dress in a size 3. I personally thought it was slightly big on her. But my daughter really thinks it is perfect, as she prefers long dresses. Or as she would say "super long" please!


If you have this pattern or plan to get it, you will get a lot of use out of it for sure! I will most definitely be making a few more of these, & perhaps a few shirts & leggings too. And don't be intimidated to use other blends of fabrics, even though the pattern calls for "knits only". Just make sure to add either a zipper or buttons if you're not using a knit. 

If you're a beginner you should be able to finish this within a 4 hour window, no problem. I probably took an hour and a half or so, and of course you can too once you're confident cutting and sewing. 

And the best part of sewing this up as usual is the cost! Here's the breakdown:

Fabric ( on sale ): $5.50
Pattern (on sale ) $1
Zipper ( on sale )  $1
Total: $7.50

Hope you enjoyed this review & can use this pattern yourself!

Tuesday, August 7, 2012

Cynthia Rowley 2497

I've had a great reason why I haven't posted to my blog for a few months....soon after my last post, I received the referral of my first daughter from China after 6 years of waiting! So I've been busy with more paperwork trying to prepare for travel. After you read this pattern review post, you can read our story at journeytomadi.com. 


But I have been sewing here and there including a few things for my daughter & some easy travel dresses for myself using jersey fabric ( love knit jersey ). But since I don't have photos ready on those yet, I thought I'd pull up some photos from a dress I made almost 2 years ago using pattern #2497 from Cynthia Rowley. 


No, this isn't me. It's actress Amy Adams, ....and she's wearing a dress by Lela Rose, a pretty expensive one I'm sure, ranging anywhere form $800-$1200. I remember seeing it a few years ago & thought I'd love to make a similar one for our annual Christmas card. Even though I do not ( & have never ) owned a single item in Red, I thought I would try wearing this very intimidating color for at least our Christmas  photo shoot. Although it's a beautiful & powerful color & I love seeing it on others, there is something about this color that I can't seem to wear...I just don't feel comfortable stepping outside of my house with, truthfully. But anyways, here's my dress....


The pattern I used is by Cynthia Rowley # 2497 and the fabric choice was a Silk Shantung. The neck ruffle may look complicated to make, but it's actually quite simple if you are an experienced beginner to intermediate sewist & you follow the instructions. 


The skirt is also pretty easy to make & it's attached to a casing at the waist. 


There's no zipper on the back, which is nice for looks, instead -the zipper is on the side, which was probably the trickiest to do. I didn't take any photos unfortunately...but the zipper was inserted between the side casing & the pocket. Yes, this pattern has pockets which is also a really nice feature to have. What's also nice about this dress is that I didn't have to line it.This pattern calls for arm facings to finish the arm holes, pretty easy to do. Overall, I really enjoyed making it, if only to wear for our Christmas Card. 

Here it is on our 2010 Christmas Card. I really do love the way it looks in the photo & I did receive many compliments. But, the truth is I have never worn this dress anywhere, despite the fact we go to quite a few holiday parties. There is something about the color red that just makes me feel uncomfortable, and I can't explain it. So if I put it on for a few minutes, I'll walk around inside the house & then decide to change.....to my favorite color Turquoise.

Now that color I can wear everyday no problem. 


p.s.: the total cost to make my version of the dress including pattern ( on sale ) plus the fabric ( also on sale ) was under $30!

Maybe I can dye the fabric to turquoise & wear it for this year's card?


Thursday, May 10, 2012

Bargain Priced Home Decor Fabric!

I had to drive to San Bernardino, California today, downtown area. Not the best area unfortunately specifically because there seems to be a lot of individuals asking for money on the streets these days, which always makes me a bit cautious. 


 But on the way back I'm glad I decided to take Foothill blvd. through Rialto because I had to make a quick U-turn after noticing this place. I can't believe I used to visit this place ( under a different name ) almost 25 years ago. It was one of the very first fabric stores I used to visit to get my fabric for my Home-Economics class in Jr. High School, paying only 2 bucks per yard. Back then they had an assortment of fabric blends, and today it seems they offer mostly 54" home decor. But guess what? This place is still packed with some pretty awesome choices at only $2 or $3 per yard!  


So....I couldn't help but shop for some pretty home-decor fabrics which are perfect for making handbags, or zipper pouches, or pillows, or magazine totes, or duffle bags.......or whatever you can think of that calls for a heavier fabric. 


See! Only $2 per yard!


But of course the $3 per yard section had a ton of pretty selections too! You'll be sure to find something that appeals to your style, you just have to go through the isles.


And there was also a ton of different trim available for $1.50 -$3 per yard. And 9" zippers for only .50¢!


I couldn't pass up this pretty tropical print in a cotton/polyester blend, which will be perfect for my spring & summer table cloths in the back yard. 


Here's a glimpse of some of the fabric I ended up purchasing at a bargain of a price!  But I also ended up grabbing a few yards of some pretty gold taffeta & a sheer off white fabric ( not pictured ) to make my parents some new drapes for their living room. But now that my mother saw it, she's so excited about it that she can't stop harassing me to start on them asap. So I will probably get to them either tonight or tomorrow just so I can move on to my own projects and be able to sew in peace!

Saturday, January 28, 2012

Simplicity 2147

I've been test sewing several patterns lately, mostly because I've been wanting to select a few easy patterns that I can use to teach garment sewing for beginners. Here's a good one I found from Simplicity. I made view B, but I'm planning to sew View A & D as well, including the belt. 


For my fabric, I used something from my stash. Believe it or not, I found this black with white pin striped cotton/stretch fabric at Wallmart for only $2 per yard. I couldn't pass it up, so I bought the entire bolt which had about 9 yards on it. 


I made a pattern size 16 and used up about 2 1/2 yards.  I also used a contrasting thread in my favorite color turquoise for topstitching & for the hem. What I loved most about this particular pattern is that it only has 4 pattern pieces, so it is perfect for beginner sewists. The pleating around the yoke area is pretty simple to learn and although the pattern suggests to use 1/2" single fold bias tape around the neck area for a finishing hem, you can get away with just folding the neck facing inward & then topstitching ( especially if you use a fabric with stretch or knit ). I did use bias tape myself, but if I make this again I will most likely not use it. And although you can't tell from my photo, I added side pockets to mine for comfort. You can also use this dress with or without a belt. I personally think it looks a bit to boxy on me without a belt. Another thing I want to mention about this pattern is that it is a mini dress, so I personally thought it was a bit too short so I added a few more inches on the length, although I could of worn it as a tunic with leggings underneath. 

If you are interested in also sewing this mini dress/ tunic but don't have sewing classes nearby that you can attend, there is a pretty good video tutorial on youtube that is pretty easy to follow. Here's the link 

Monday, August 15, 2011

Cynthia Rowley 2406


I finally finished this dress -pattern design by Cynthia Rowley, #2406. I had cut out the pieces a few months ago actually, and just this past Saturday I pulled it from my "to finish" bin and spent about 3 hours or so sewing it (including pressing time). I made view D ( but I added about 4 inches to the length), and it literally has 3 pattern pieces in addition to a pocket if you want to add it. I love dresses with side pockets and I was so excited about inserting them ( so excited that I didn't bother with taking an accurate measurement of where I wanted them placed ). So when I actually sewed on one of the side pockets, serged the seams, and tried in on for fit -the side pocket was way too low. By then, I was just not in the mood to rip out the seams & start over, so I ended up scratching the side pockets idea and sewed up the side instead. But I really love how this dress fits, so I will definitely make a few more ( with accurately positioned side pockets ). & I will also have to try the shorter version ( as originally designed ).


Here's the back view. I love the opening on the back & the kimono style sash.


Here's a pic of me wearing it to a wedding. 


And here's what the pattern looks like. My front view photo though, doesn't quite look like the top cover photo above ( view D ) does it? I think because I didn't loosen it up around "Matilda's" waist ( my bodyform ) & because I made it a few inches longer. But overall, I really liked this pattern. I found it to be pretty simple & I will definitely be making a few more of views B & C.

Saturday, May 14, 2011

My first Singer Sewing Party

Here's a few pictures from my first sewing party ( on May 7, 2007 ) sponsored by Singer. They provided me with the Singer Confidence Stylist sewing machine for the demonstration, & I was also provided with thread, patterns, fabric, coupons, & a few other little things from Jo-Ann's, Martha Stewart & Burda. Overall, we all had a wonderful time & we can't wait to get together again.

I personally really liked the Singer Confidence Stylist, primarily because of it's simplicity to use & the easy drop in bobbin ( without the need to pull up the bobbin thread with the hand wheel ), & also because it has 66 decorative embroidery stitch options.


Here's the winner of our threading race........can't believe we were all beat by a guy!


My youngest guest "Alex", & first time sewist. She was able to not only complete her fabric accessory case, but she also managed to make her very first pin cushion all under 1 hour.


Here I am with another one of my guests "Nellie", who also just recently opened her etsy store Bonita Couture. The outfit I'm wearing btw....I completed the night prior using pattern Simplicty 2374.


Also the day before....I made several fabric tie string bags for my guest to hold their fabric, patterns, and other goodies.


It was a Salad bar & lasagna & cupcakes for my guests.


& here's a few books from my sewing resource library I put out for my guest to enjoy.